
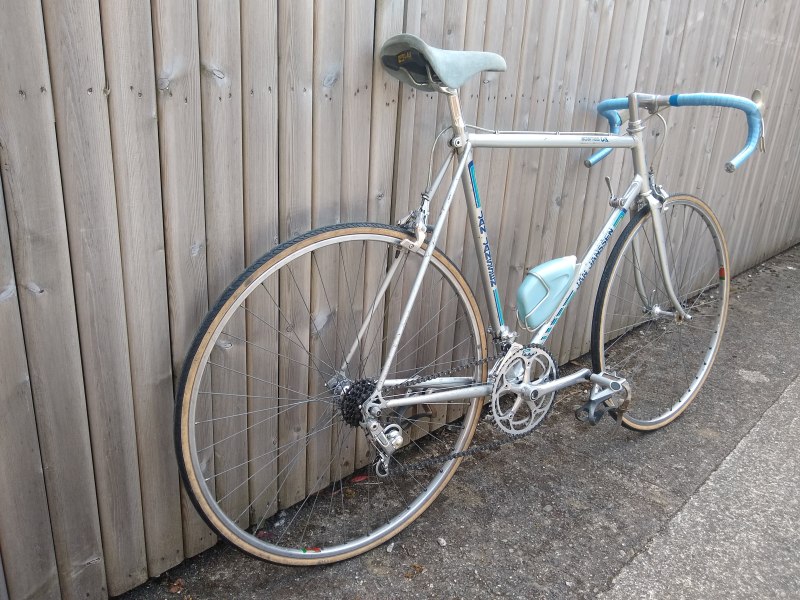
Jan Janssen 1982 Aero Bike
The Jan Janssen was bought (in January 2016) as part of a 4 for 3 deal from a dealer in The Netherlands (through Facebook). This one was essentially "the freebie" as the other three bikes had a real purpose for me - one for Nikki, one for use as a winter bike by me, and another for me (a Colnago which I wanted). These bikes are described in detail elsewhere.
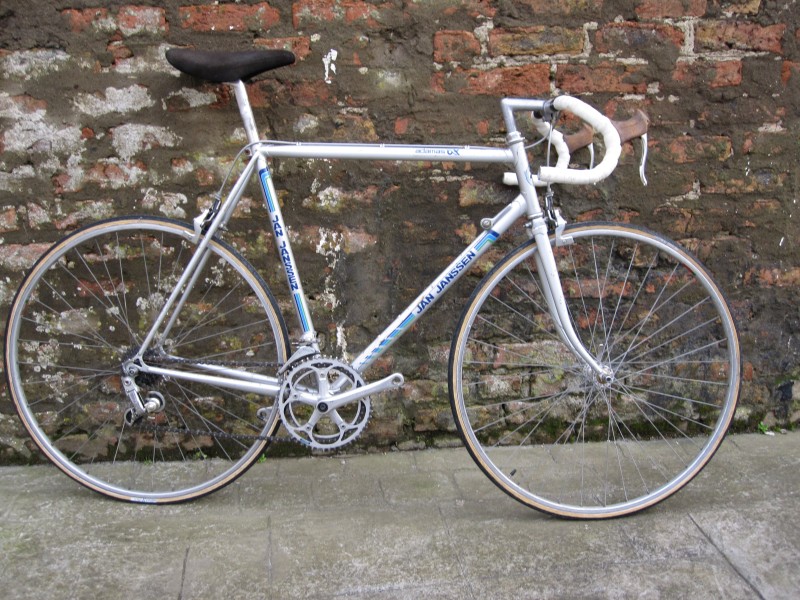
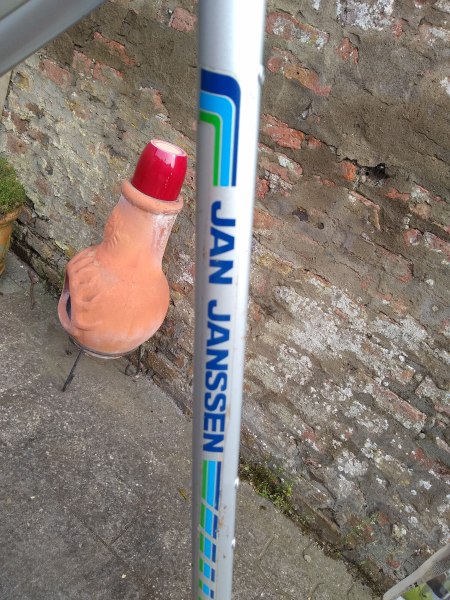
The attraction of the Jan Janssen was really in it"s weirdness. It was from 1982 but was an aero bike with ovalised tubes, aero brake levers, and a Shimano AX groupset (admittedly the Adamas version which is bottom of the pile) and it was Shimano"s first attempt at making people buy the full groupset instead of mixing & matching from various manufacturers. It was their first indexing system (with the brains in the derailleur not the lever), first aero brakes, weird brake calipers, and strange adventurous bottom bracket. As Shimano opted for a lot of new technology, and realised that they made a few bad decisions on the way, they abandoned a lot of the ideas after 3 years, so the AX became the equivalent of Ford Motor Co"s Edsel car - weird, ahead of it"s time, and rather rare. My example is more interesting than valuable, the Adamas AX is the basic groupset (a fair bit of steel and not all alloy), the frame is built by Panosonic (under license from Shimano) and is gorgeous looking but feels a bit heavy so the tubing is probably basic.
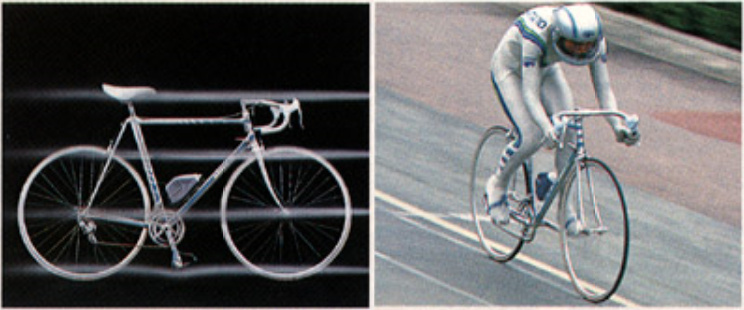
This is what Shimano were selling - Aero and Designed in a Wind Tunnel
This is what I got

2016 to 2020
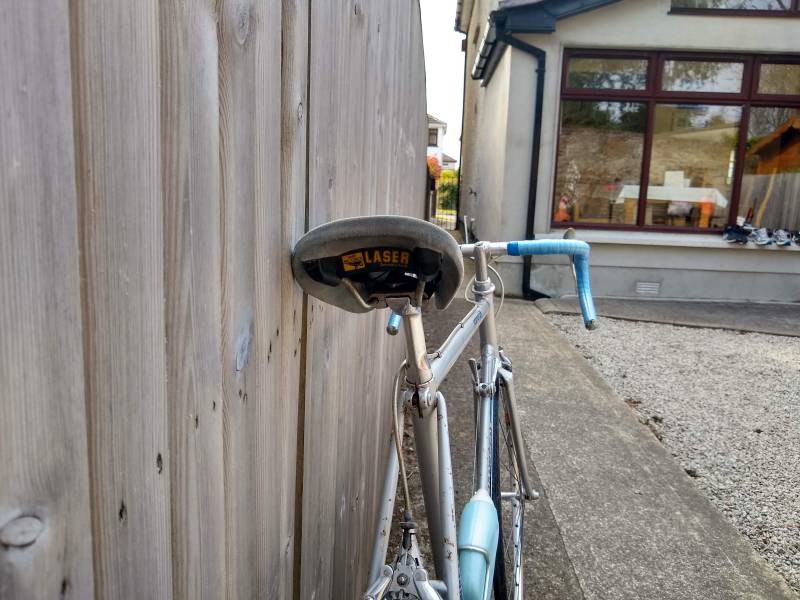
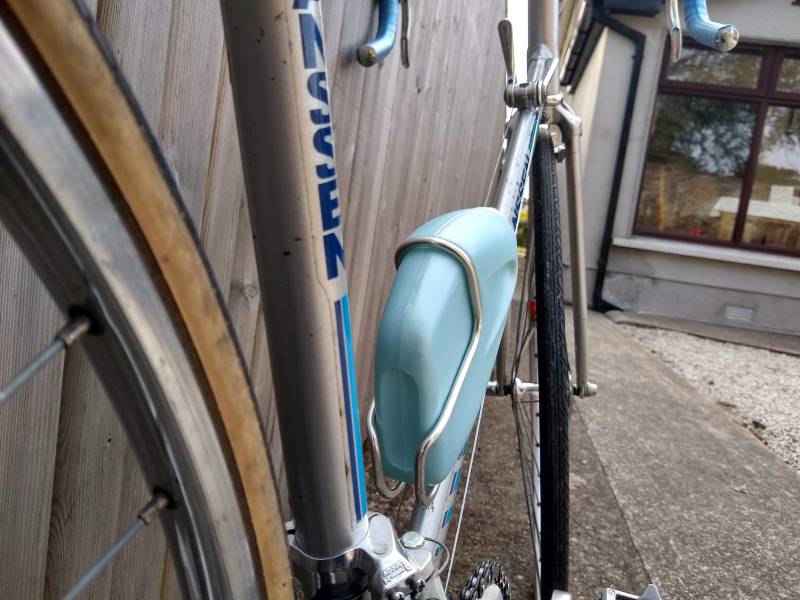
I bought this in January 2016, identified a nice saddle from another bike I bought about the same time and kept the saddle aside for when I would restore the bike. I then spotted, on Ebay, an aero water bottle that would fit the aero bottle holder that was on the bike and bought that and also set it aside. By chance I spotted a set of aero Shimano pedals with toe-clips from around the same period, again on Ebay and bought these too. Finally, I thought some blue Benotto handlebar tape would be period correct and match the saddle that was set aside for the bike, so I bought some on Ebay. This was all over a two year period. And still I did nothing with the bike. Then came the 2020 Coronavirus Pandemic and lock down. I started working through my outstanding bike projects and quickly got around to the Jan Janssen.
This is the Renovation Story
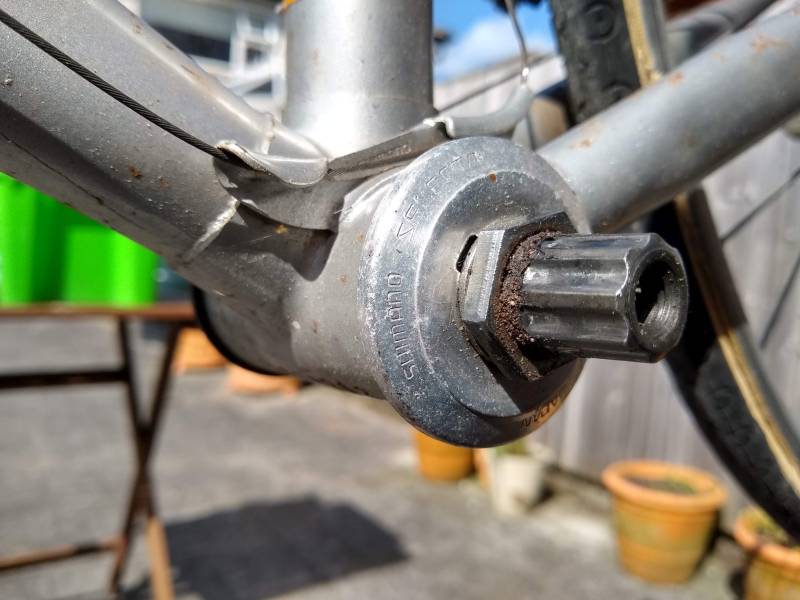
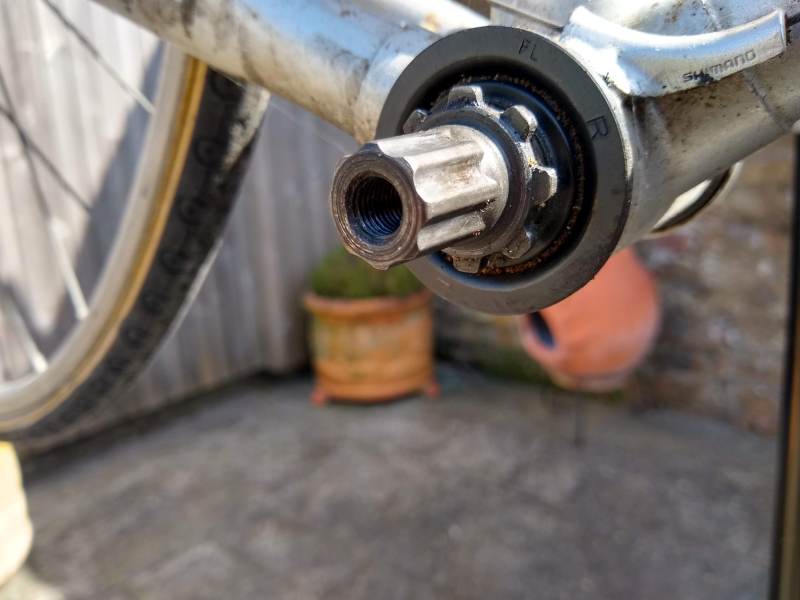
I stripped everything off the frame except for the Headset and Bottom Bracket. The headset feels perfect. The Bottom Bracket feels like there"s no grease but it runs very smooth. As it"s a weird BB I plan to leave it alone and build the bike, if I"m worried about it after a couple of spins, I"ll strip it down and lubricate (I think it"s straightforward). The plan being to remove the patina (rust) from the frame and seal it, and clean up all the components (the alloy has gone grey and looks unappealing), then reassemble along with the parts that have been set aside and try the bike out. Then I"ll work out what I want to do with it. There"s also the small matter of the front wheel not spinning properly, the bearings/cones/races are either dry/sticky/badly worn - as we"re on Covid-19 lockdown, I hope it"s the simplest of all three options.
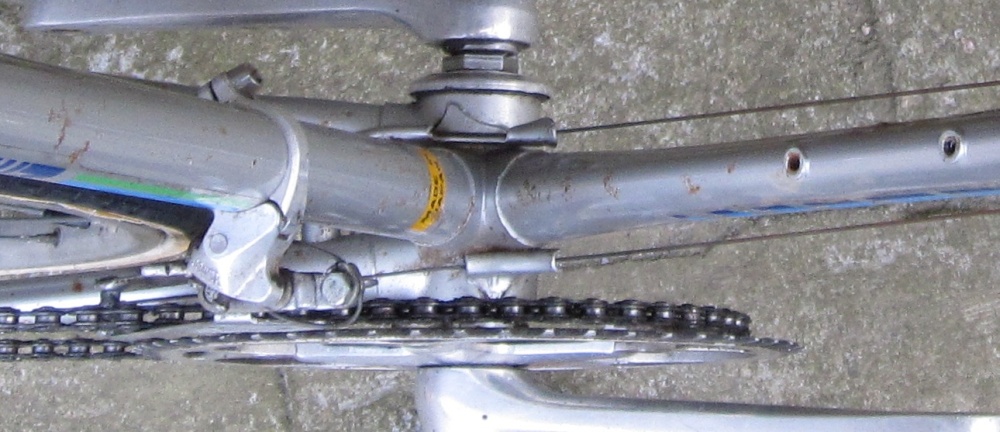
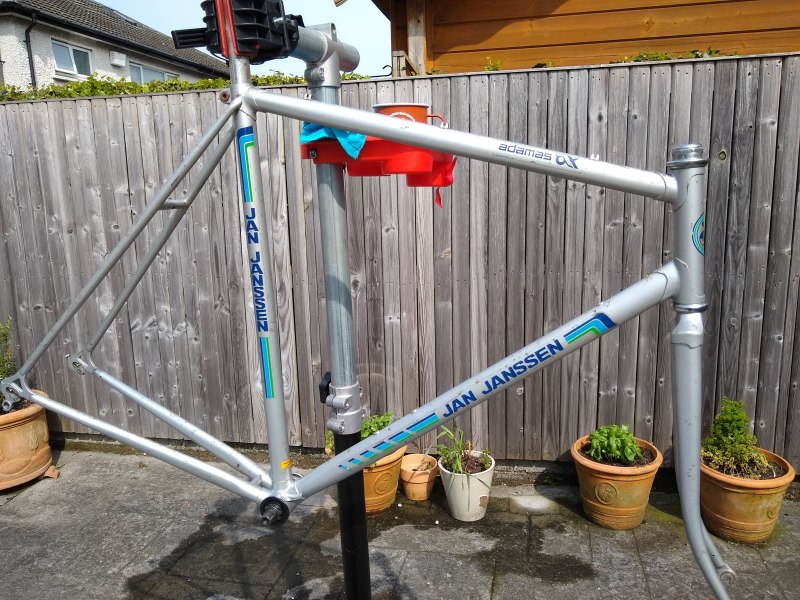
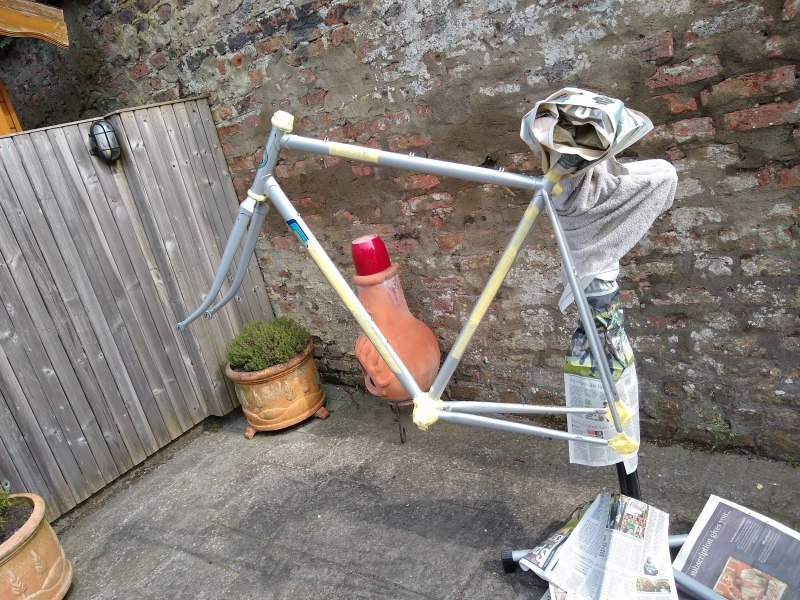
The Frame
Lots of scratches and surface rust, but frame otherwise in great condition. The frame with fork and complete with headset and bottom bracket weighs exactly 4.0 kg. This is not lightweight and probably reflects a basic frameset to go with the basic Adamas AX Groupset. But it looks really good - and that"s important.
As we were in the middle of Covid-19 lockdown, anything I did with the frame had to be done within my own house and with no access to supplies from outside. So, the headset and bottom bracket were pretty good or at least good enough, so I decided not to open them. After all this Covid-19 is gone, and if I sense a problem with either component, I can open it up and inspect and take it from there (that"s my logic for the rear wheel hub as well). So the plan with the frame and fork itself is to clean it up, remove the rust and/or rust stains and seal the paintwork.
Firstly I practiced on the front fork, rubbed it down with aluminium foil and WD40, which made it smoother and removed some of the tops off the rust. Then I tried Vinegar as a rust remover, wrapping an area of rust in a vinegar soaked tissue, covering with cling film and leaving aside. Checked at 30 mins, 3 hrs, and then finally overnight - no change in the rust. As I couldn"t afford to use a real rust remover which would blacken the rust and nearby paintwork, given that I had no access to paint supplies for some repainting, I decided that I would just do the aluminium foil with WD40 on the complete frame.
Once that was done, I turned my attention to the decals/transfers on the bike, having initially thought that the transfers were in bad condition, I realised I was wrong. There were a few bits torn, a corner or two lifting, and a long edge which was curling up and peeling a bit with a chaffed edge. The transfers were rather thick plastic and where they peeled/lifted they had gone hard and stiff. For the long peeling chaffed edge, I cut a new edge with a Stanley knife. Then for all lifted/torn/peeled bits, I put some spots of super glue inside the transfer and pressed down on it, applying a bit of electrician"s tape to hold things in place. The following morning, I simply removed the electrician"s tape. A pretty perfect result.
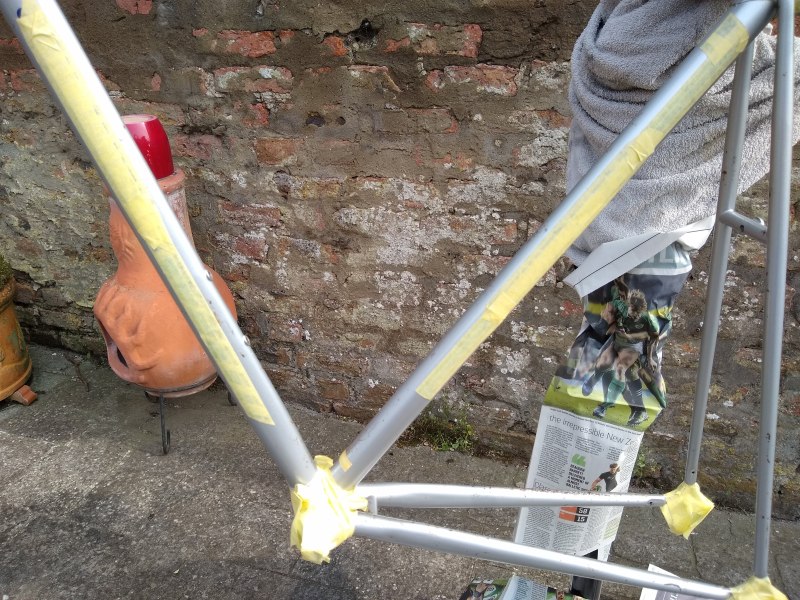
The final stage was to tape off the BB, Headset, Dropouts, and carefully tape over all the decals/transfers (a far few rounded edges/curves here). Once taping was done, two coats of clear coat, which was all my already half used rattle can could sustain and my frame looked pretty good.
The Frame during cleanup, clear-coating, and afterwards

The Components
These really only needed cleaning and polishing (with a little extra work here and there). My basic cleaning tools are T-Cut (Car paint cutting polish/compound) and Turtlewax Car Polish - I have had these for a long time and rarely use on cars (I"ve changed my preferred wax product). I will also use WD40 and Aluminium Foil to remove oxidation, and Vinegar to soak rust steel bits as an oxidation remover (rust on steel bits).
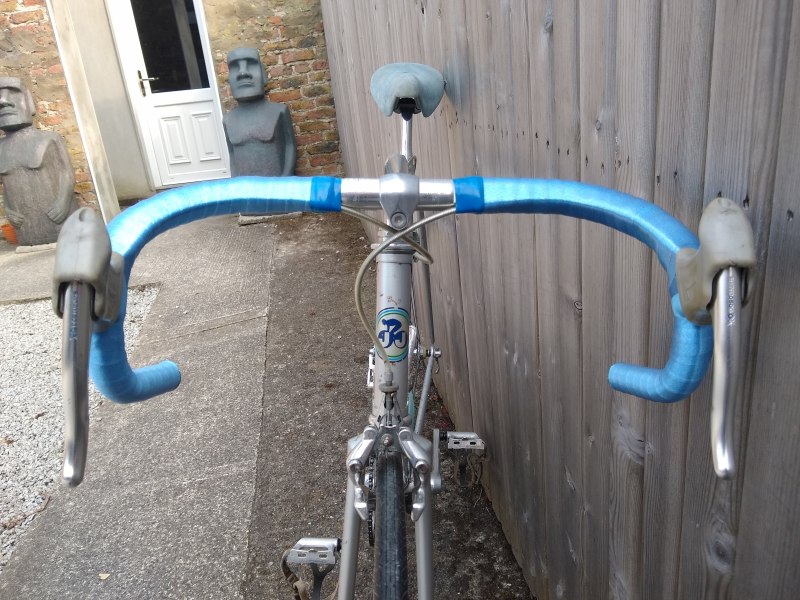
Stem and Bars : I left these together, brake levers were removed, but cables and bar tape left on. My plan is to fit the Benotto Bar Tape over the existing tape to make for a more comfortable grip (no padding in the Benotto Tape) - this plan is subject to the Benotto tape being long enough to allow for the thicker bar/old tape diameter. Simply a lot of rubbing, first with T-Cut, then with car wax. Pretty good results.
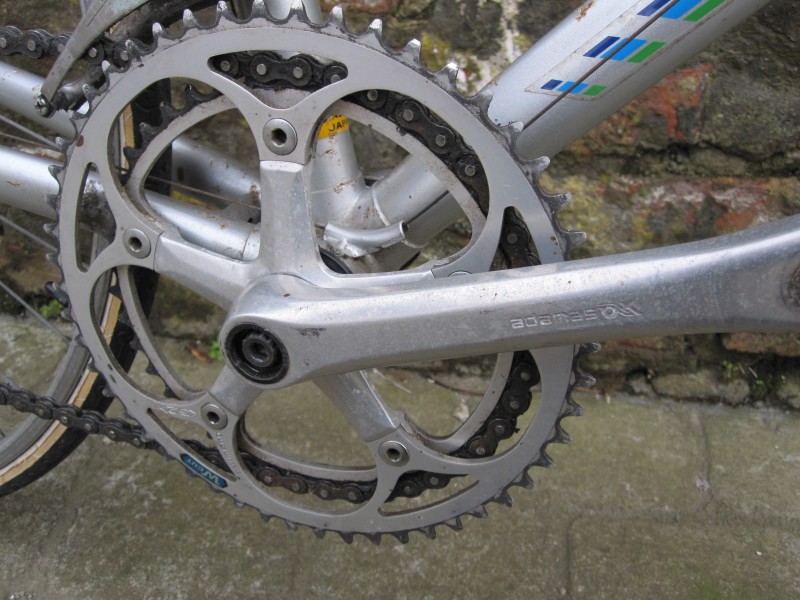
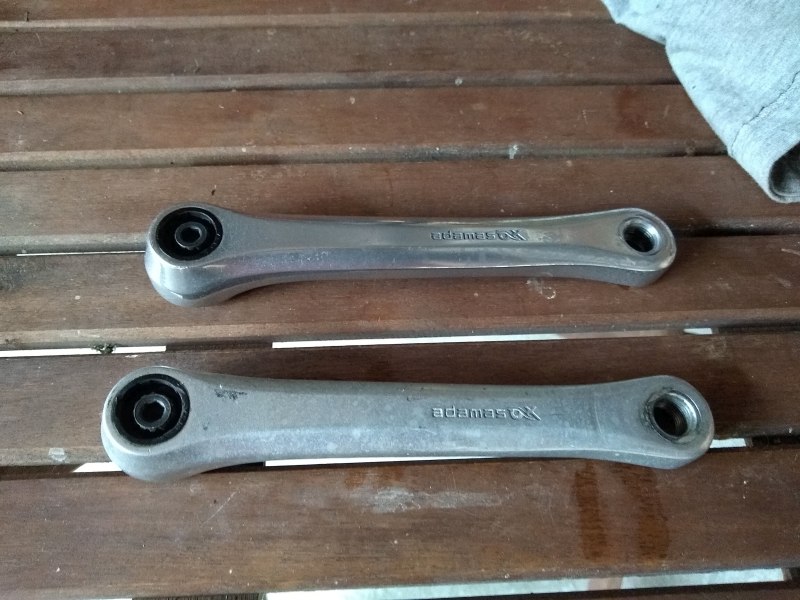
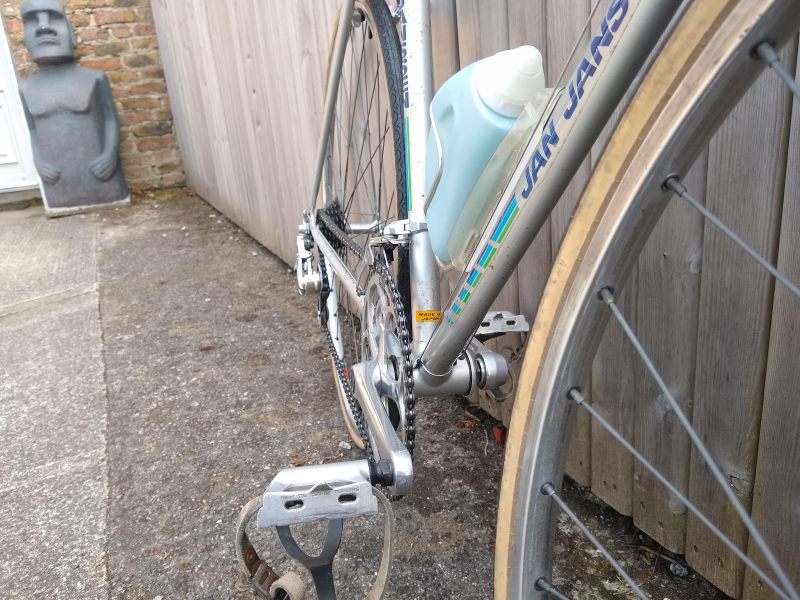
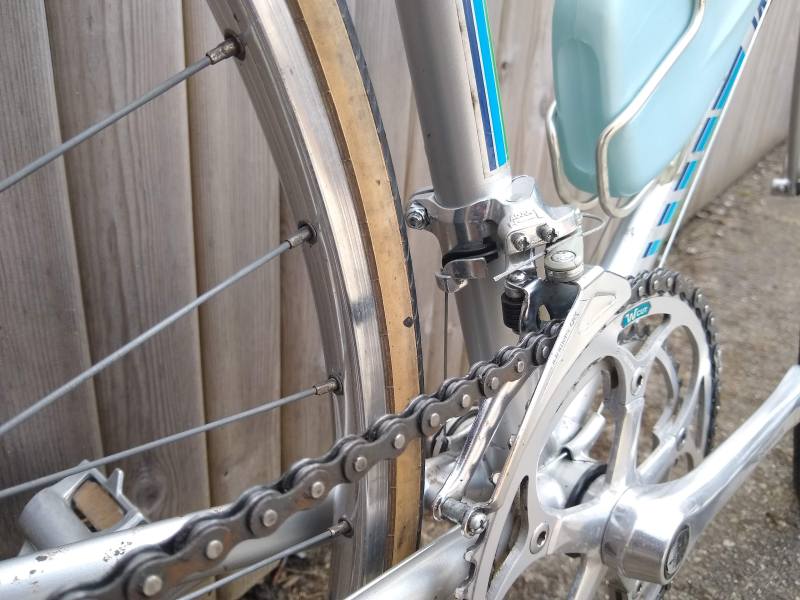
Chainset and Cranks : T-Cut and Car Wax - hard work but really good result.
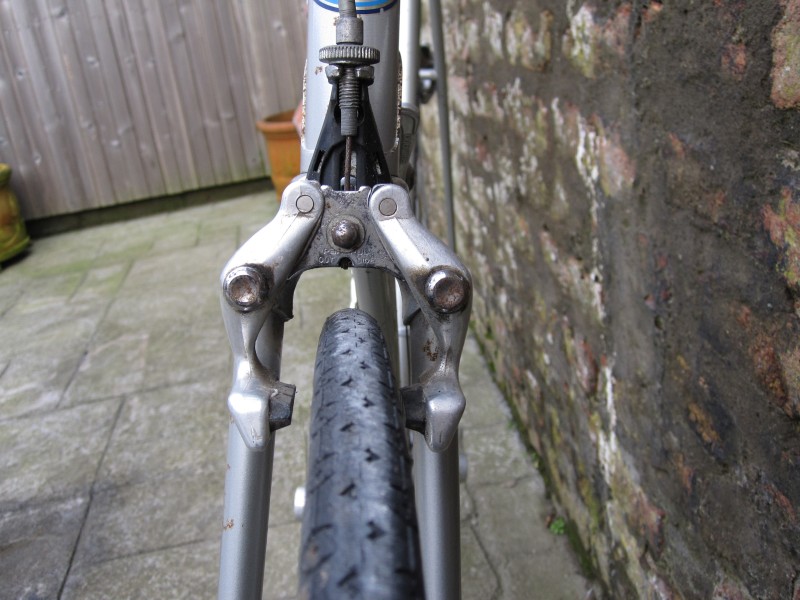
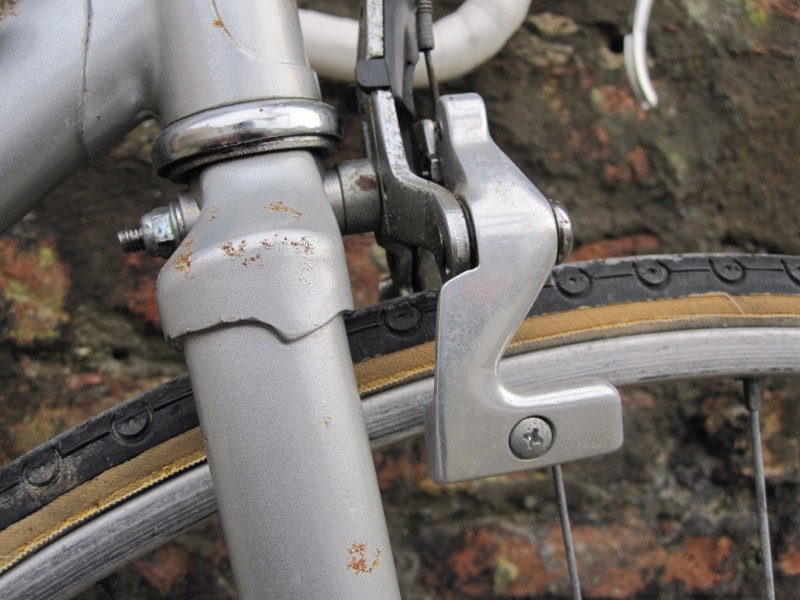
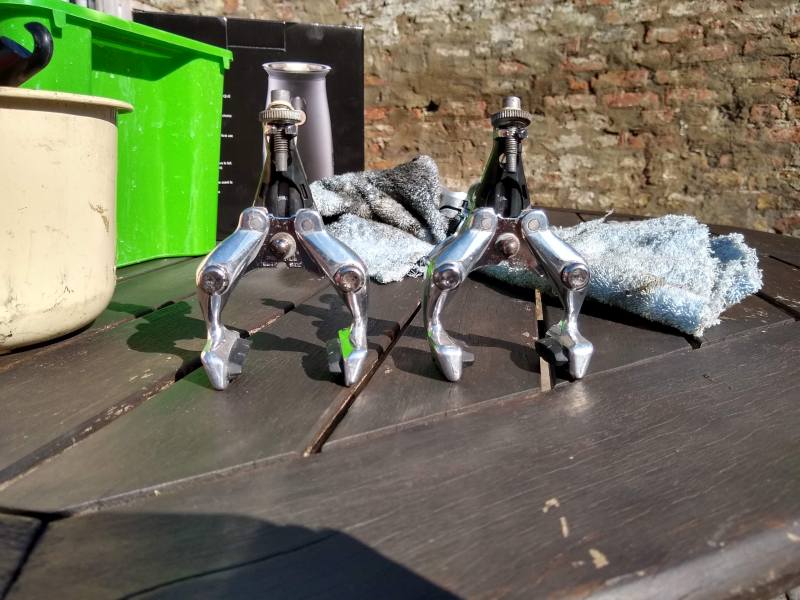
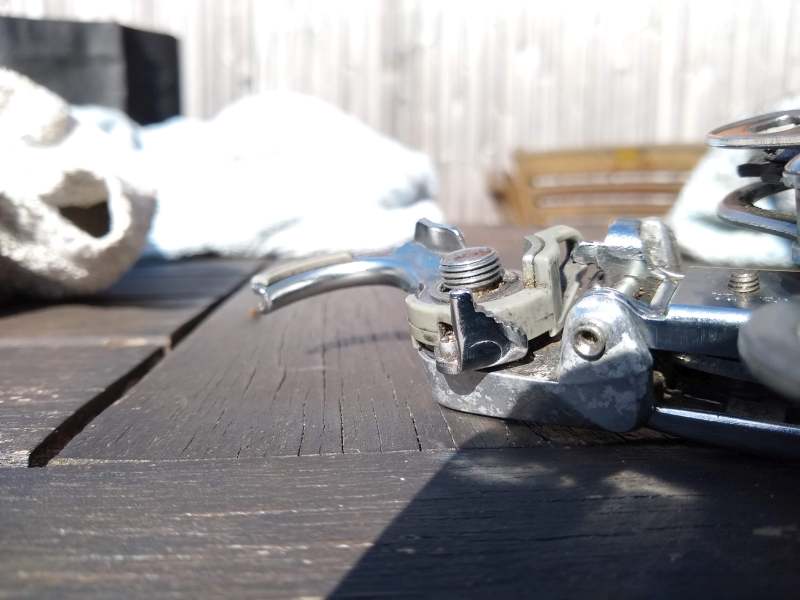
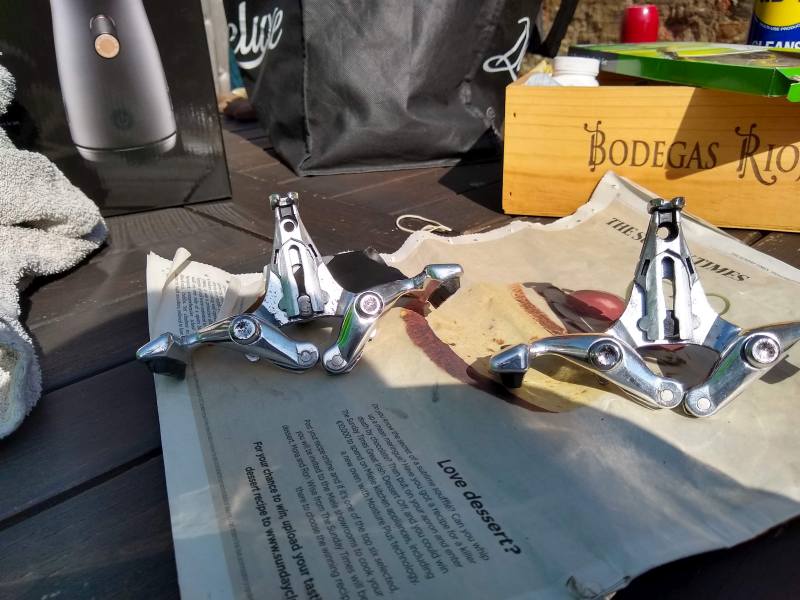
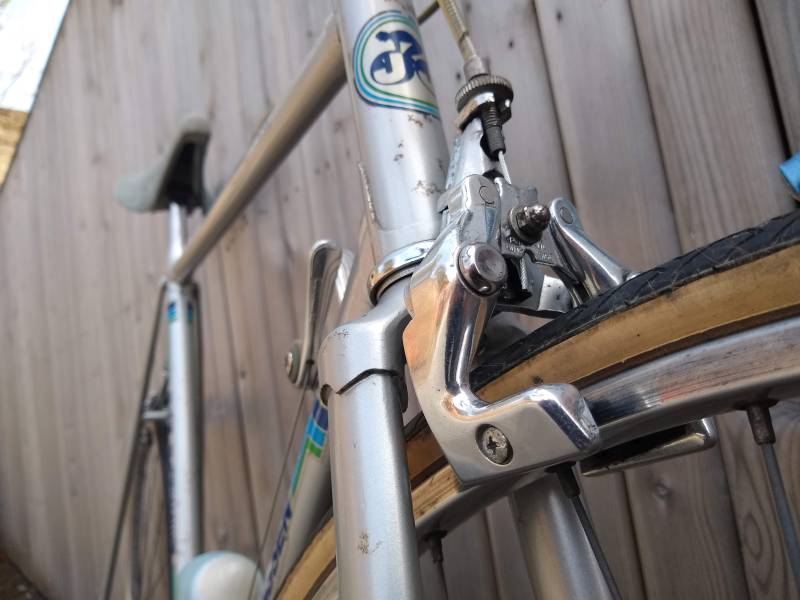
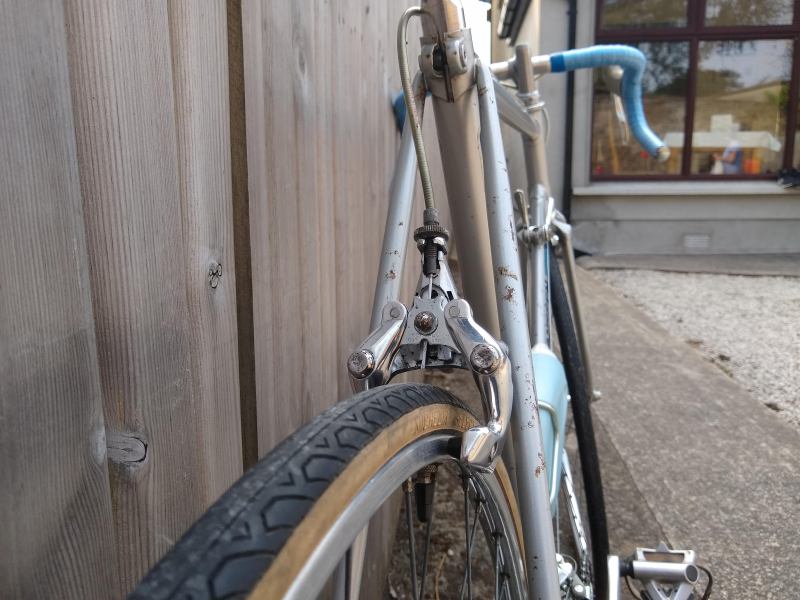
Brake Calipers : These had some steel and alloy (and some black plastic). Used T-cut and Car Wax on the alloy (hard work), used Vinegar (brushed over rust spots on steel), soaked the alloy brake adjuster screw and adjuster ring, and applied Car Wax to steel parts. Then decided to paint over black plastic with metallic silver paint that I had (by brush) and finish with a gloss clear coat (again by brush). Overall result was pretty good and hides the black part.
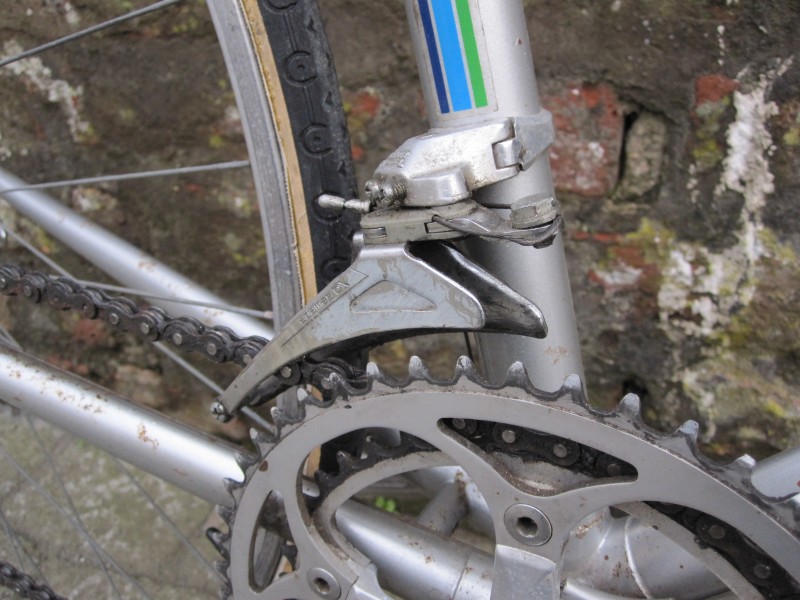
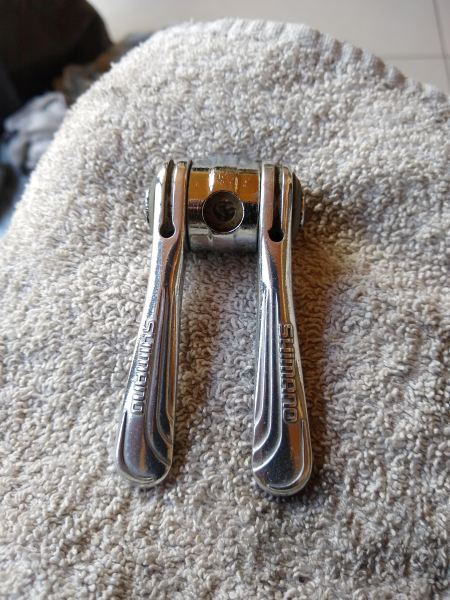
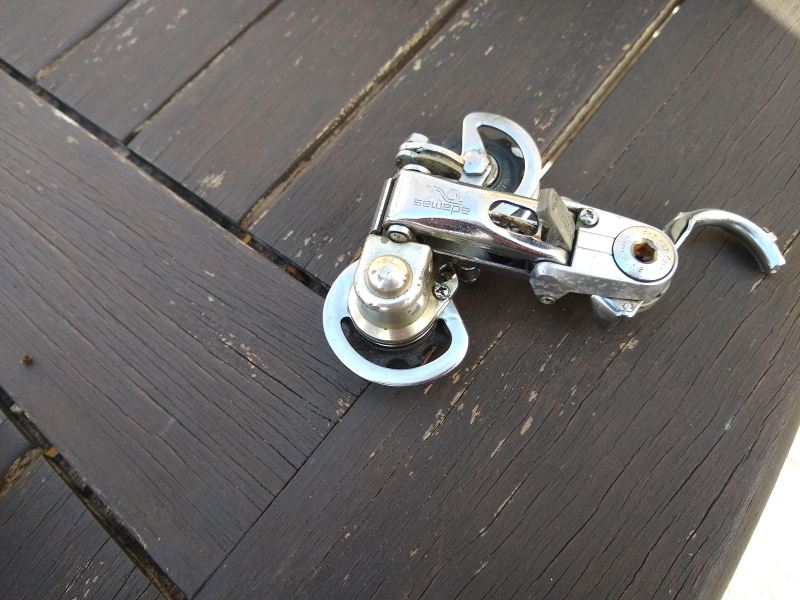
Gear Levers, Rear Derailleur, and Front Derailleur (mix of alloy and steel with some plastic) : Cleaned Derailleurs with fine screwdrivers for hard to get places and oily rag for other areas. Applied T-Cut to discoloured alloy, and then Car Waxed everything. Good result.
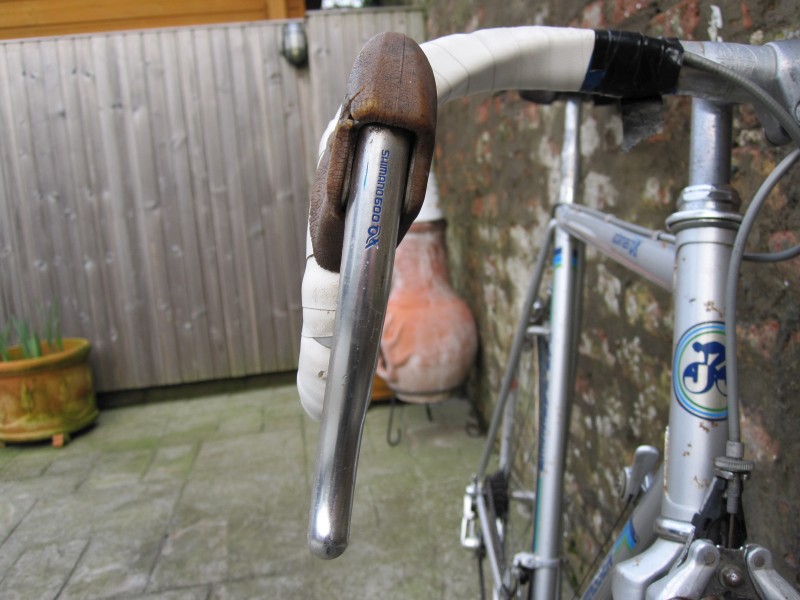
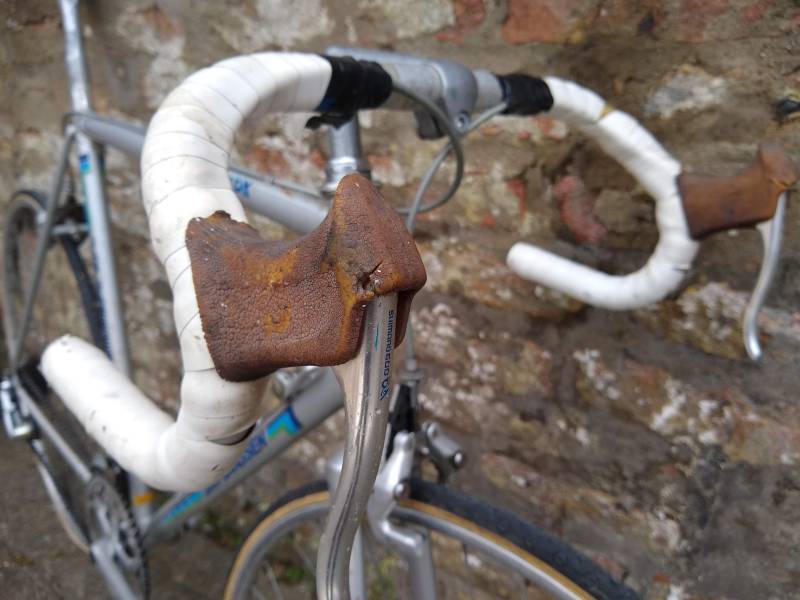
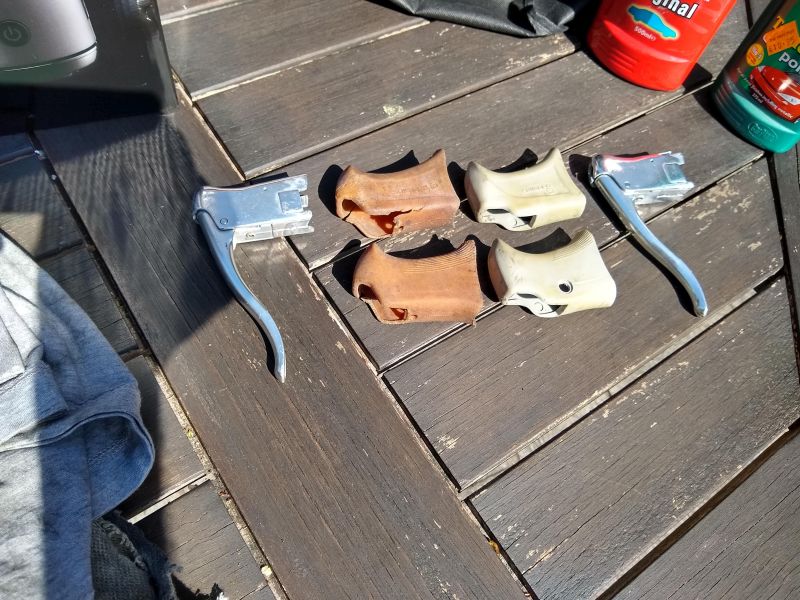
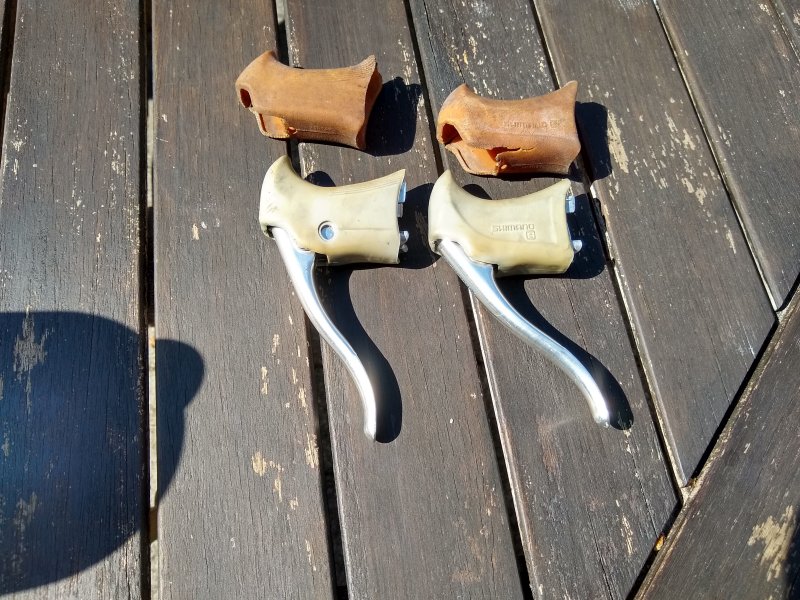
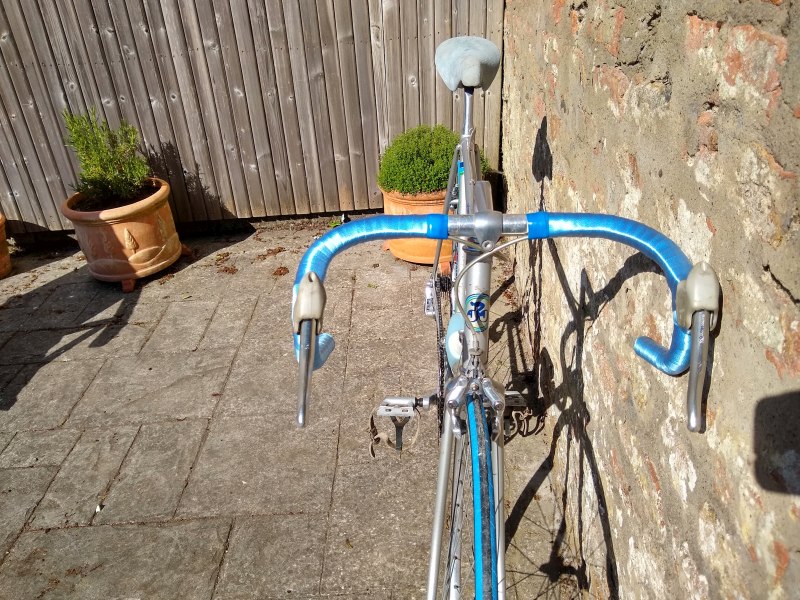
Brake Levers : These were Shimano 600 AX (a big step up from Adamas AX) and the main problem here was the brake hoods - they were rotten, Originally gum hoods they were now bubbly, cracked, and brittle - with some cracks and tears. They had to be dumped, but I had managed to obtain a really good set of Adamas hoods that I knew would fit. So, I removed the old hoods, polished the levers with T-Cut and Car wax and installed the replacement hoods. To ensure no accidents with the new hoods, I rubbed a bit of liquid soap on the levers and pre-soaked the hoods in almost boiling water (to make them extra pliable) and fitting was very easy (I know from previous experience that it is so easy to tear a replacement hood when fitting and as hoods for these AX levers are like hens teeth and consequently very, very, expensive, I did not want any accidents). End result is excellent - and the replacement hoods being Grey in colour will suit the bike.
Seat Post : Last of the smaller components - this was in use to hold the frame on the bike stand, so by this time the frame"s clear coat had fully dried, so I removed the frame from the stand and removed the post and seat post bolt. The seat post was treated to some T-Cut and Car Wax with great results. The seat post bold was a bit rusty at both ends, so the ends were painted with Kurust (turn rust into an inert substance) and then overpainted with my metallic silver to give a good approximation of what the bolt originally looked like.
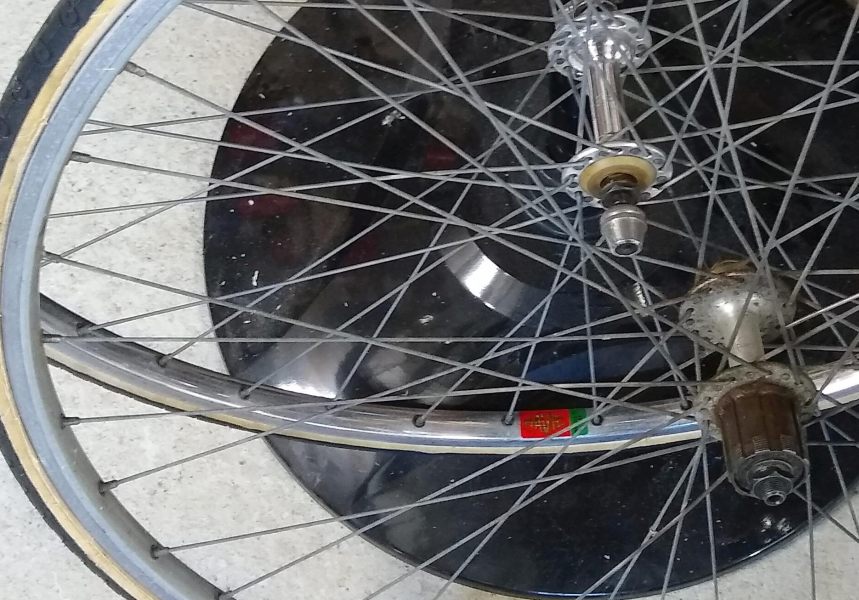
Front Wheel : This was not spinning on it"s axle properly, actually it was doing more sticking than spinning - hopefully just dried out grease, but before cleaning this, I needed to make sure it was useable. So I removed the axle, and cones, bearings etc. Cleaned and inspected the bearings, cones, bearing races in the hub. The cones had some marks that I would ordinarily deem too bad to use, but everything else looked ok other than needing a good clean up. So I cleaned all up as best I could and regreased the hub and reassembled. The result was pretty smooth, probably not good for thousands of miles but would suit my needs and more importantly, I could build the bike while in Covid-19 Lockdown. I cleaned the wheel by using WD40 and Aluminium foil on the zinc coated steel spokes and the braking surfaces on the wheel rim, and T-Cut and Car wax on the hub surface and rim surface (not braking surface). To ensure no polish went onto the rim, I finished off by wiping the braking surfaces with WD40.
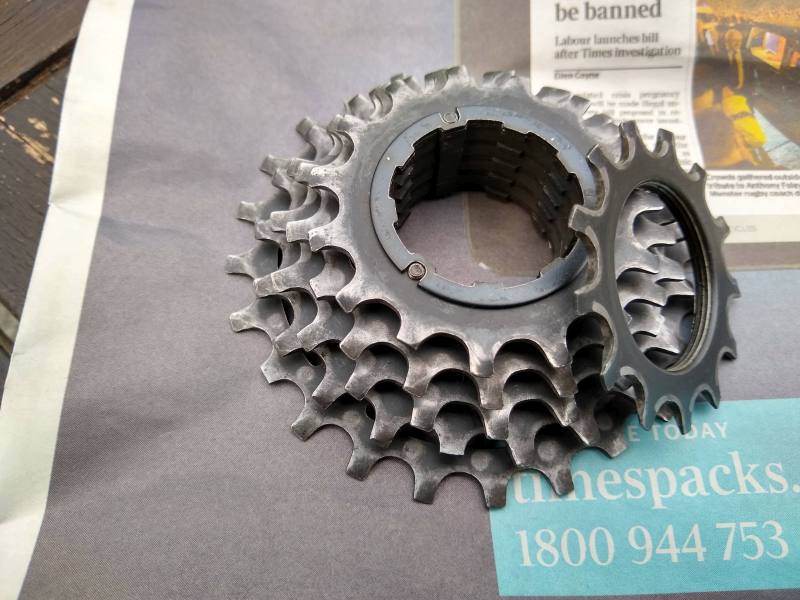
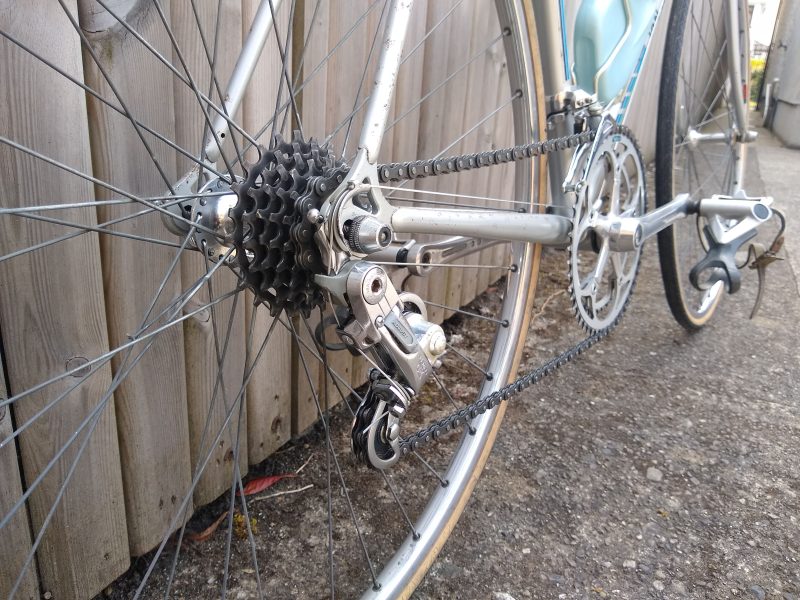
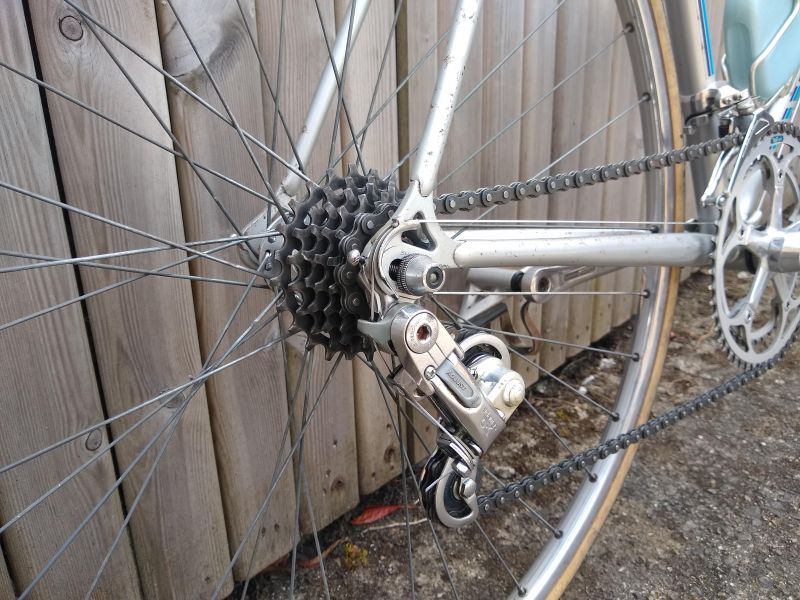
Rear Wheel : This wheel was smooth, so I decided just to clean and polish it and I removed the cassette for better access to the hub. The grease/oil/dirt on the cassette was like treacle. Bits that were meant to be separate were effectively glued together, so I decided to clean it up. The great thing about Shimano UG Cassettes is that they can easily be taken apart. Did that then WD40"d everything, cleaned and reassembled. Really glad I did this, very messy, and a bit thankless, but good to have a really clean cassette - especially as a lot of the dirt seemed like fine sand - think the bike may have lived on reclaimed land in The Netherlands. Once the cassette was done, I simply treated the wheel exactly as I had with the front wheel and got the spokes, rim, and hub looking pretty good. Finished off by refitting the clean cassette.
Chain : I decided to reuse this as it was not worn, it was the right length, and it was a Sedis chain. This was a brand I was very fond of in the 80s/90s and I always made sure I used that brand. When removing the chain, I was careful to identify what looked like a split link (was a bit different to all the others) and left the pin still in the link. The chain was filthy though, and I had to go through it link by link with a fine screwdriver prising off all the hardened dirt on both inside and outside of each link. End result was good though.
The Components - Mostly photos of post cleaning and Polishing.
Photos of Cranks, Brake Calipers (1st Photo), and Wheels show one before cleaning and one after cleaning.


Timeline for cleaning/repairing work listed above
As this was done in lockdown, there was no hurry and it was good to have a project. So the above work took 12 days elapsed. I"d guess there was 30 plus hours of actual work. I preferred to work outdoors in the garden and the weather was good which facilitated this. But when the weather was bad (cold or wet), I just skipped the day. Also, work was really confined to a period in the afternoon as the morning was taken up by exercise and brunch, and then the late afternoon was dinner (we tried to eat outdoors too and the weather was largely facilitating this as well, provided we ate early). So it was an easy going cleaning project and as a result I got some of the alloy a bit shinier than I might otherwise have done.
Assembly and Build (this is the rewarding part - always love this stage)
Full of enthusiasm, I laid out frame and all the components and accessories for a photo call before I began. It looked great. I began the assembly directly from the photo set.
The bike frame, components, and accessories all laid out for a photo.
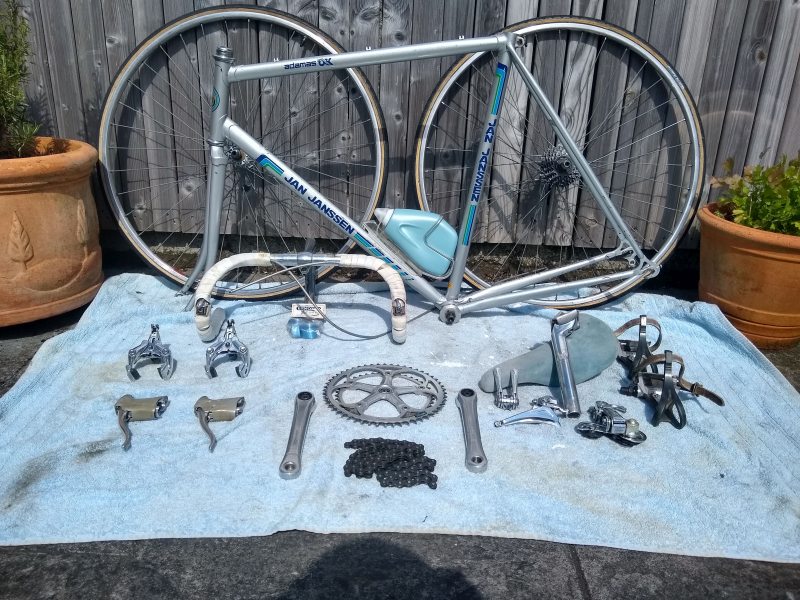
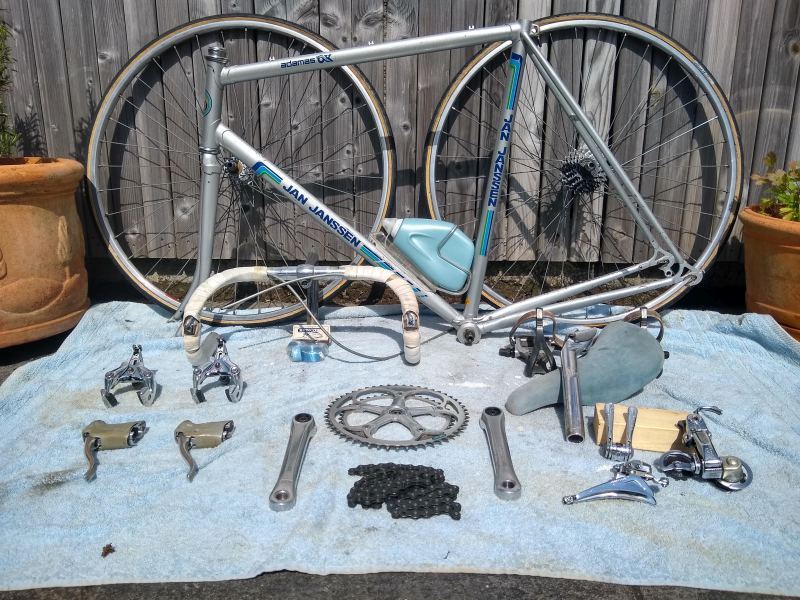
All the bits & pieces
Crankset and chainset went on first (the chainset is separate from the driveside crank - chainset sits on a spline of the BB and the crank sits on a smaller spline and is screwed up tight to the chainset), followed by front & rear derailleurs and shifters. Next came the fabulous brake calipers (interestingly the mounting bolt for the calipers sits in a slot within the caliper so you can move this up or down depending on whether your frame requires long reach or short reach brakes - a clever idea). Then I fitted the stem bar combo and set about fitting the brake levers, while doing this I decided to fit the internal brake cables into the outside cables already on the bars (under the existing tape) and here I ran into a problem - the rear cable was crimped and the cable would not fit through. Luckily, I had a spare cable set left over from another project and this led to a slight change of plan. So I removed the existing tape which I had planned to use as a liner for the Benotto tape and will now forego the liner (this might be a blessing in disguise as I believe the Benotto tape is rather short and may not accommodate a liner tape which makes the bars "fatter").
Rather than follow up with the brake cables again, the following day I decided to sort out the tyres for the wheels (just for something different to do) and as it was stay home lockdown, I was going to use what I already had available. For my Covid-19 Project Bike Number 2, I had been given back a bike I"d previously built up for my son in 2012 (after he had written off his own bike) - I used a frame (Stratos - a Lidl Supermarket brand) I had, and put his components from the damaged bike onto this Stratos. Anyway he gave it back to me a few months ago and I had planned to take the components (Tiagra 10 speed) off it and replace them with Sora 9 speed I had, and also replace the wheels with an older set and eventually sell the bike. So, I had done that a couple of weeks ago, but I put a pretty nice looking set of Michelin tyre on it - grey with white sidewalls. I thought these tyres would look good on the Jan Janssen. So I set about taking the Michelins off the Stratos and replacing them with a set of plain black tyres, then removed the very old, cracked, ripped set of tyres from the Janssen, and tried fitting the flashy Michelins to the Janssen - I say tried....I couldn"t even get the leading edge of the tyre onto the wheel. I threw them into the bin, and went looking at what I had lying around. Only a couple of old slightly cracked Michelin Select tyres, so I fitted them to the Janssen. They look pretty much like the ones I took off the Janssen, except they are less cracked and are not falling apart at the beading as were the previous ones. They"ll do until I can order a few real tyres over the internet. What a waste of the days work on the bike - well only a couple of hours but nothing to show for it really. Will do the brake cables and bar tape tomorrow.
All through this process I was beginning to regret the Benotto Tape idea. Reading up, it seems it is barely long enough to fully wrap the bars, added to that it was going to have to stretch over the brake cable which would run under the tape, plus I wanted to pad the bars a bit to make them comfortable. And, the tape wasn"t cheap (I usually order cork type tape from China on Ebay which is very cheap) and any mistake would be expensive. I hit on an idea which would reduce the amount of tape needed - as I rarely use the drops (read "never" as I mount the bars a lot lower than the saddle), I"d only pad the tops of the bars with old bar tape and this would also hold the brake cable without putting a strain on the Benotto tape. So I did just that.
First I fitted the brake levers, complete with inner and outer cables connected to the levers, I figured this was the easiest way to get the cables and levers connected, and as they were the first gen aero levers, it turned out to be a smart idea. With the levers in situ, I put the old tape on the bar tops in the process securing the cable to the bars.
Then I started on the Benotto tape and was careful not to have much overlap of this on the drops, and wrapped up to the top to see how much spare capacity I had, cut this spare off, unwrapped back to below the brake lever and cut the spare to fit either side of the brake levers (fixed the spare bits with dual sided sticky tape) and re-wrapped the area around the brake levers and on up to the top. Repeated with the other side of the handlebars (but for this side I knew how much spare I could cut off beforehand). I have to admit, the job worked out almost 100% (one reason I hate doing bar tape is I don"t think it"s possible to get it 100% and anything better than 95% is a great job).
Brake and Gear Set-up and Adjusting
The brake calipers have an adjustment screw to take up wear on the pads, but I like to keep all this adjustment available for future wear, so I try to get the calipers adjusted very tight. The caliper applies the brakes by a "slider" triangle shaped piece of thin steel (sliding in grooves in the caliper arms) being pulled by the cable upwards and forcing the tops of the brake arms apart against the tension of their springs. As these caliper arms are pivoted at a point lower down, the lowest portion of the arms containing the brake blocks are pushed in towards the wheel. I started with the rear brake, got all cables into position with inner cable lightly attached to the slider, then I tried holding the calipers/pads close to the wheel (against the tension of the springs) and moving the slider upwards along the cable. I really needed three hands and to be multiskilled. Eventually, I removed the back wheel having worked out I wanted the pads to be set 25mm apart, and tried again. No matter what, I could not get the setup with the pads anything like 25mm. Then I figured out I could affix the slider to the cable while it was free from the calipers and gently position it into the grooves in the caliper arms afterwards. So, I tried this, measured the pad distance, marked the position on the cable and reset, moving the slider a bit further up the cable. I did this a few times until I achieved the required pad distance. Problem solved. I simply repeated the process with the front brake. Footnote - the day after doing this, my Kool-Stop replacement pads arrived from Ebay (I"d ordered these as I heard that the AX brakes were never very good and I thought new rubber would be better than old rubber and some experience of riding vintage bikes with vintage brake pads). The new pads were easy to fit and didn"t alter the caliper setup, which was good.
Gear setup was surprisingly easy. I had photographed the cable routing through the derailleurs (which was rather odd) and repeated the sequence. Without a chain it was not possible to test but things moved when asked to move, and things looked to be about right.
Finally, I installed the chain, happily the universal link was fairly easy to reset and linkup, a bit tight but gently manipulating the chain pin, plus using a screwdriver to prise the chain plates apart a little got things moving freely. After that I installed the pedals to assist with aligning the gears/chain.
Adjusting the gears was then pretty simple. The high-Low screws set, and only the rear derailleur needed careful checking to identify that the correct step on the derailleur was engaged when the chain was on a particular cog (i.e. 1st step = 1st cog) and there is a concealed adjuster screw which physically moves the derailleur body closer to/further from the wheel to allow fine tuning of the chain on the cogs- this worked surprisingly easily. Once set up for one cog, it was correct for all cogs (the beauty of indexing built into the derailleur rather than the lever).
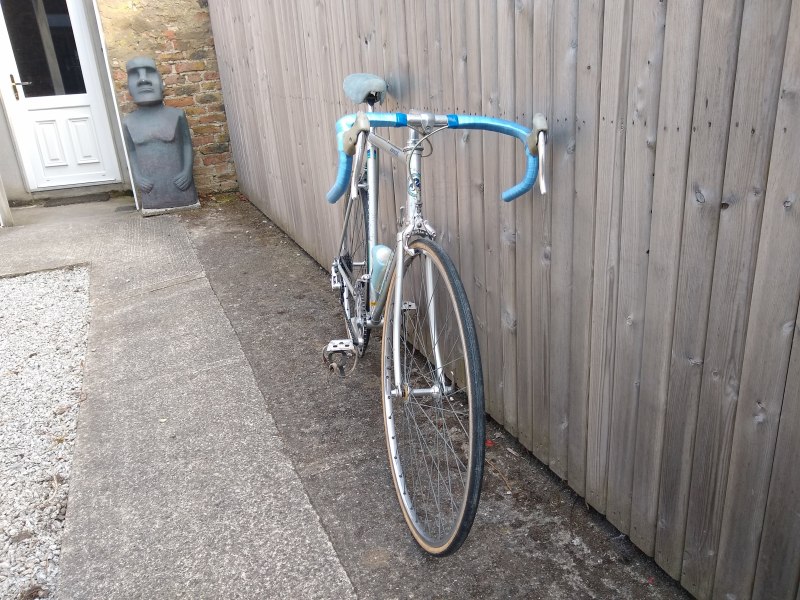
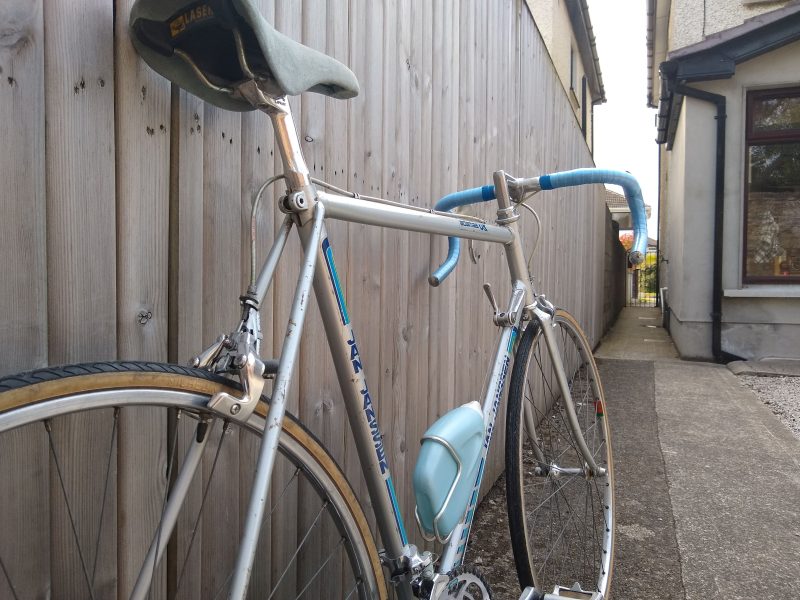
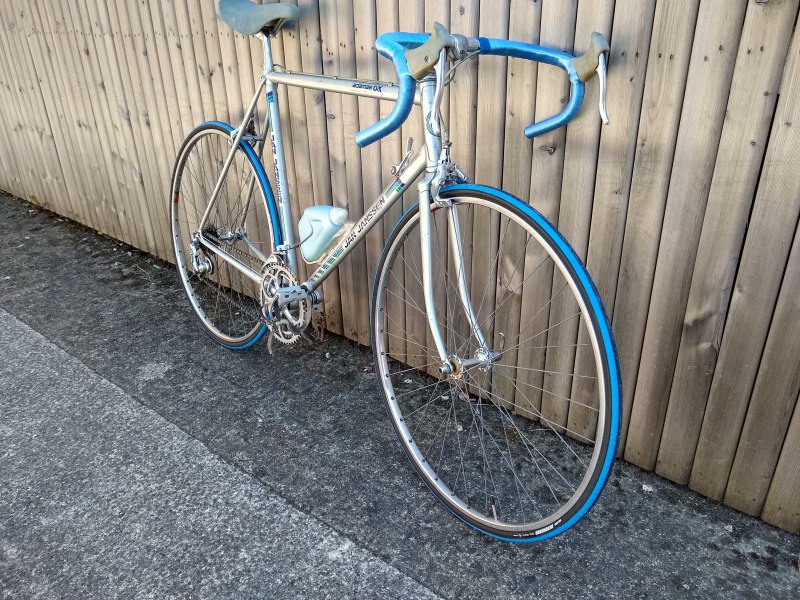
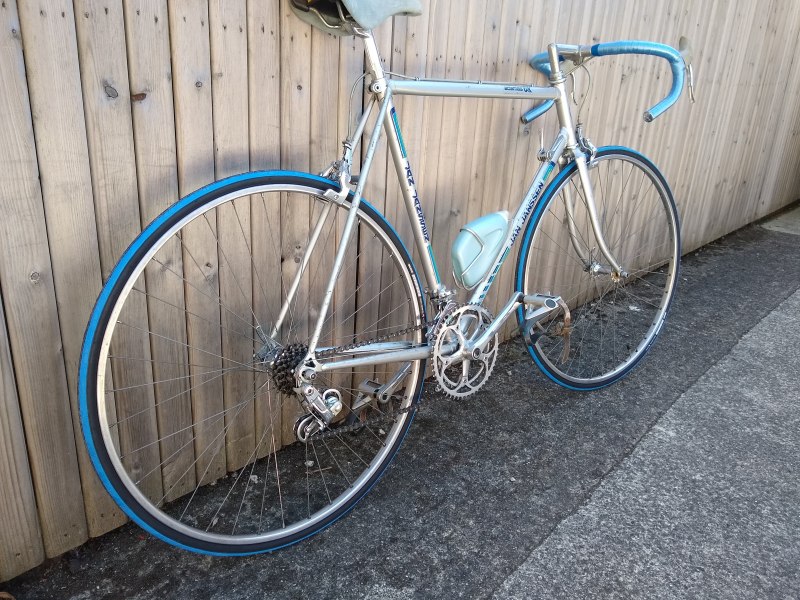
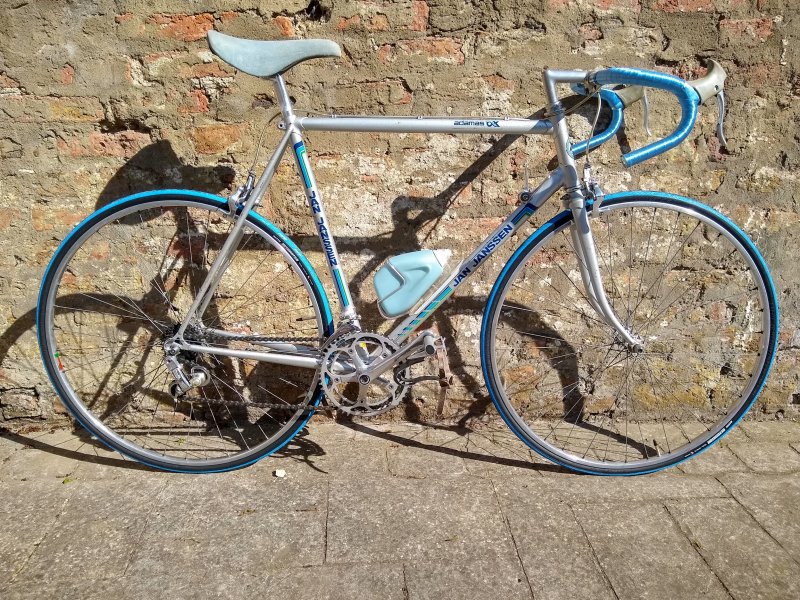
The finished project. Hopefully you can see the quirky stuff on the bike, and the narrow ovalised top and down tubes.
I think it looks beautiful and is a great addition to my collection.

The first spin
Ok, because of lock down this was of necessity going to be a short spin - measured in metres not kilometres. Adjusted saddle to correct height for me. Distance to bars (from saddle) was close to what I need and I"m a bit flexible on this anyway. Pushed the bike up to a flat road a few yards from the house, slipped into the toe clips and pedalled away. Everything worked. Gears were precise, brakes were actually good and felt normal. Conditions were bone dry, and calm, and the road perfectly level, so this is how it should be. The only "disappointment" was the gear indexing, you cannot sense it through the levers - the AX marketing documentation (of which I have a copy) suggests that you can...but you can"t. You need your friction shifter sense to know where to put the lever, however when you get it "about right" the step controller in the derailleur aligns the chain perfectly. But as there are no clicks, or other, signals from the levers you can easily move two or three gears in error. But, I need to do a longer cycle before I can fully comment on this, and that will have to await the end of the lockdown to the extent that real cycling becomes permitted again - hopefully this summer as I don"t see this bike being used in winter weather. I"m also waiting on replacement tyres as I would not trust the old rubber on it at the moment for more than a trip around the block - currently ordered on the internet as bike shops closed. Got a call from the shop to say that they are not in stock but should be in soon - told them there was no rush.
One final note (at least until I get back from a real, decent, spin)
I felt this frame/fork combo was a bit heavy at 4.0kg for frame/fork/headset/bottom bracket, and although built by Panasonic, it is not marked as Tange tubing (I had sort of hoped it was Tange). I also know that the Adamas AX is the poor relation of 600 AX and DuraAce AX, and it uses a lot of steel in it"s construction, so it"s not light either. When completed - all components, pedals, bottle cage, wheels/tyres, it weighed in at 11.5kg. As comparison, my 1980 Peugeot CFX-10 Super Competition (full Reynolds 531, inc stays, and fitted with mainly Shimano 600 Arabic) which was Peugeot"s top frame at the time and a real true racing bike, this comes in at 9.6kg. So, I figure my Jan Janssen is about 2.0kg overweight (that"s about 4.5 lbs in other money) - with it"s pretty big gearing I did not plan on taking it into the mountains too often so the weight shouldn"t be a problem.
The road test and the tyres
After about 2 weeks (while I was busy with the next lockdown project) I got another call from the bike shop, the tyres were still not in, but they offered me a better set at same price. I explained they were for an old bike and as there was a lot of blue colour on the bike, I was still prepeared to wait. But, they said that the tyres they were offering had blue stripes too - I perked up and accepted the Maxxis Detonators offered (good puncture resistance which I like). They arrived the next day, fitted very easily, and a day later took the bike out for a 15km, slightly hilly and twisty spin. As it was a quirky bike I was a bit nervous of it's reliability so stayed close to home. And the verdict - all is good. Would it be a favourite bike to ride? No. Will I bring it out as a conversation piece? Definitely. It's additional weight was unnoticeable once moving. The gears (with the indexing on the derailleur and not the levers) were no different to, nor better than, friction shifters. In that statement I might be hiding that my experience over 15km was limited and later in the spin I might have been changing gears better - I am used to friction where I retension the cable after every change by pulling the lever back a little (to feel the tension), I do this instinctively and it may have been upsetting the index built into the derailleur. Maybe if I trusted it it a bit better I would be rewarded by a better experience. The brakes are good though - maybe the Koolstop pads helped there. And when up and running the bike itself felt firmly planted and pretty responsive. The aero water bottle however is not conducive to long rides and it's water nozzle is fiddly and weak. But the bike is quirky and quite striking so it will get a bit of fair weather use to the coffee shop, once the coffee shops open up again.
Finally complete - Blue Tyres and all
Contact me by email : alan_cowzer@hotmail.com
Contact me through Facebook : My Peugeot CFX-10 Facebook Page
© 2018- 2026 Alan Cowzer